Sunday, September 6, 2020

Potato bread (single loaf)

I adapted this from a Better Homes & Gardens recipe from my old BHG cookbook. The original was for two loaves, but we don't eat bread that fast. It's easier to make a single loaf when I need it. Here's the halved recipe. 


  INGREDIENTS

  • 1 small potato, peeled and cubed
  • 1 cups water 
  • 1 package active dry yeast 
  • 3-31/2 cups all-purpose flour 
  • 1 1/2 tablespoons sugar 
  •  1 tablespoon shortening 
  • 1/2 tablespoon salt 
  • All-purpose flour or cornmeal (optional)
PROCEDURE 
Oven 375 

In a medium saucepan cook potato in the water about 10 minutes or til tender; do not drain. Cool cubed potato mixture to 110° to 115°. Set aside 1/4 cup of the cooking liquid. Mash potato in the remaining liquid; add enough warm water to make 1 cup mashed potato mixture. 

In a large mixer bowl soften yeast in the reserved 1/4 cup potato liquid. Add mashed potato mixture, 1 cup of the flour, the sugar, shortening, and salt. Beat at low speed of electric mixer for 1/2 minute, scraping sides of bowl constantly. Beat 3 minutes at high speed. With a stand mixer I use a paddle attachment and run at medium high speed for 2 minutes. 

Stir in as much of the remaining flour as you can mix in with a spoon or your dough hooks attachment. Turn out onto a lightly floured surface. Knead in enough of the remaining flour to make a moderately stiff dough that is smooth and elastic (6 to 8 minutes total). Shape into a ball. Place in a lightly greased bowl; turn once to grease surface. Cover; let rise in a warm place till double (about 1 hour). 

Punch down; turn out onto a lightly floured surface. Cover; let rest 10 minutes. Shape into a loaf. Place in greased 8x4x2-inch loaf pan. Cover; let rise till nearly double (about 35 minutes). 

If desired, brush top with a little water and dust lightly with additional flour (traditional) or cornmeal. I prefer to brush the top of the loaf with butter after baking. Bake in a 375° oven for 40 to 45 minutes or till bread tests done, covering with foil the last 15 minutes of baking to prevent over browning. Remove from pans; cool on a wire rack.

Sunday, July 26, 2020

Sourdough Sandwich Loaf

When the COVID-19 lockdown started and people started panic buying food and household items, I ran pretty quickly into an empty bread aisle. “No problem,” I thought. “I can bake bread.” Then I found the baking aisle was devoid of any yeast to make bread with. YIKES.
Now, my mom used to keep sourdough starter in her kitchen, so I knew it was possible to draw down yeast from the air and create a yeast colony. And. I found lots of info on the ‘net about how to get a starter going. So I started working on my own starter.
Well, after several attempts my bread was still coming out like bricks. I tried several different recipes but the truth seems to be that my starter just wasn’t robust enough.
While I wasn’t able to produce bread I was happy with, I did find other things I could make with the starter that I was happy with. One was a recipe for crackers made with leftover starter. (Here's my variation that includes parmesan cheese).  And more recently, I found you could make a nice coffee cake with starter.
But after several weeks of mistreatment (missed feedings, long periods in the fridge, etc.) I seem to have finally gotten a colony that is consistently producing nice loaves of bread. It’s my belief that the “mistreatment” caused natural selection to let only the strongest yeast survive, thus strengthening the starter.
The current recipe I’m using is this one: Basic Sourdough Bread on Food.com. I have been able to use both all-purpose flour and bread flour with this recipe, though the bread flour has produced a much finer texture and lighter bread.
If you try any of these, let me know how they turn out and any changes you make.

Homemade Pizza (Pepperoni & Sausage)

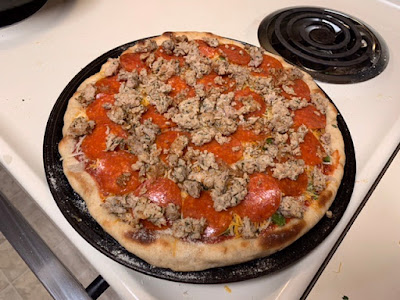
Pizza is ready for bakingI got a hankering for pizza last week and rather than spend money at Domino’s, Pizza Hut, Papa Murphy’s or Marco’s, I decided to make my own. Since I’ve been working with sourdough starter, I found this recipe for a sourdough crust. By using bread flour, it made a nice, thin crust that was crisp and crunchy. All purpose flour would made a softer crust. 
Next, I opened a can of tomato paste and an 8 oz can of sauce. I seasoned with some frozen onions buzzed fine in the food processor and added fresh oregano, basil, and parsley from my garden along with some dried thyme and a pinch of cayenne. I added some water to the sauce to thin it a bit and spread half on the crust, freezing the rest for next time.

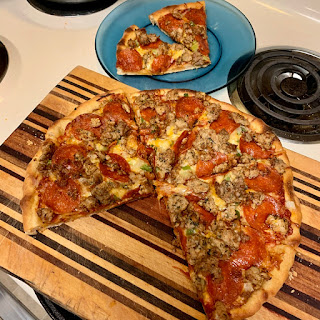
Pizza sliced after bakingOrdinarily, I use an Italian shredded cheese blend but since I already had some Colby Jack on hand, I used that, putting down a layer of cheese, then some green pepper and onions, then a second layer of cheese. Lastly, I added the pepperoni and some fried Italian sausage. It made for a heavy pie!

But boy, was it good! And since so many of the ingredients were already in the kitchen, it cost a fraction of a delivery pizza!

Wednesday, April 22, 2020

Sourdough Crackers

I’ve been working with sourdough starter since the COVID-19 quarantine has left me with extra time on my hands. One of the things I’ve hated is tossing out part of the starter when I feed it. I just recently found out that there are even recipes that use the discarded starter! I’ve made these twice and they disappear quickly.

The basic recipe I’m using is from King Arthur Flour’s site and this is my modification of the original recipe, since they leave the choice of seasoning to you.

Ingredients
  • 1 cup (113g) King Arthur White Whole Wheat Flour
  • 1/2 teaspoon sea salt
  • 1 cup (248g) sourdough starter, unfed/discard
  • 4 tablespoons (57g) unsalted butter, room temperature
  • 2 tablespoons dried herbs of your choice (see my herb mixture below)
  • oil, for brushing
  • coarse salt (such as kosher or sea salt) for sprinkling on top

Herb Mixture
  • 1/4 tsp onion powder
  • 1/4 tsp garlic powder
  • 1 tsp oregano
  • 1 tsp parsley
  • 1 tsp basil
  • 2 Tbl Parmesan cheese

Instructions
Mix together the flour, salt, sourdough starter, butter, and optional herbs to make a smooth (not sticky), cohesive dough.
Divide the dough in half, and shape each half into a small rectangular slab. Cover with plastic wrap, and refrigerate for 30 minutes, or up to a couple of hours, until the dough is firm.
Preheat the oven to 350°F.
Very lightly flour a piece of parchment, your rolling pin, and the top of the dough.
Working with one piece at a time, roll the dough to about 1/16" thick. The dough will have ragged, uneven edges; that's OK. Just try to make it as even as possible.
Transfer the dough and parchment together onto a baking sheet. Lightly brush with oil and then sprinkle the salt over the top of the crackers.
Cut the dough into 1 1/4" squares; a rolling pizza wheel works well here.
Prick each square with the tines of a fork.
Bake the crackers for 20 to 25 minutes, until the squares are starting to brown around the edges. Midway through, reverse the baking sheets: both top to bottom, and front to back; this will help the crackers brown evenly.
When fully browned, remove the crackers from the oven, and transfer them to a cooling rack. Store airtight at room temperature for up to a week; freeze for longer storage.
NOTE: If the center crackers are not dry enough, leave them out to dry for an hour or two.

"Corner Brownie" Cookies (Gluten Free!)

My friend Todd makes these terrific gluten-free cookies out of brownie mix! His recipe is below. INGREDIENTS 1 16oz brownie mix (I use ...