Showing posts with label baking. Show all posts

Sunday, July 26, 2020

Sourdough Sandwich Loaf

When the COVID-19 lockdown started and people started panic buying food and household items, I ran pretty quickly into an empty bread aisle. “No problem,” I thought. “I can bake bread.” Then I found the baking aisle was devoid of any yeast to make bread with. YIKES.
Now, my mom used to keep sourdough starter in her kitchen, so I knew it was possible to draw down yeast from the air and create a yeast colony. And. I found lots of info on the ‘net about how to get a starter going. So I started working on my own starter.
Well, after several attempts my bread was still coming out like bricks. I tried several different recipes but the truth seems to be that my starter just wasn’t robust enough.
While I wasn’t able to produce bread I was happy with, I did find other things I could make with the starter that I was happy with. One was a recipe for crackers made with leftover starter. (Here's my variation that includes parmesan cheese).  And more recently, I found you could make a nice coffee cake with starter.
But after several weeks of mistreatment (missed feedings, long periods in the fridge, etc.) I seem to have finally gotten a colony that is consistently producing nice loaves of bread. It’s my belief that the “mistreatment” caused natural selection to let only the strongest yeast survive, thus strengthening the starter.
The current recipe I’m using is this one: Basic Sourdough Bread on Food.com. I have been able to use both all-purpose flour and bread flour with this recipe, though the bread flour has produced a much finer texture and lighter bread.
If you try any of these, let me know how they turn out and any changes you make.

Homemade Pizza (Pepperoni & Sausage)

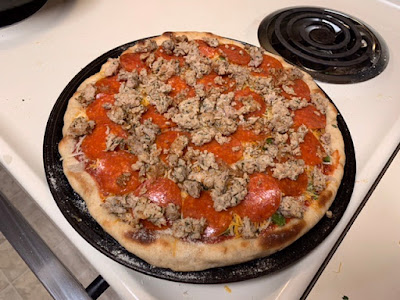
Pizza is ready for bakingI got a hankering for pizza last week and rather than spend money at Domino’s, Pizza Hut, Papa Murphy’s or Marco’s, I decided to make my own. Since I’ve been working with sourdough starter, I found this recipe for a sourdough crust. By using bread flour, it made a nice, thin crust that was crisp and crunchy. All purpose flour would made a softer crust. 

Next, I opened a can of tomato paste and an 8 oz can of sauce. I seasoned with some frozen onions buzzed fine in the food processor and added fresh oregano, basil, and parsley from my garden along with some dried thyme and a pinch of cayenne. I added some water to the sauce to thin it a bit and spread half on the crust, freezing the rest for next time.

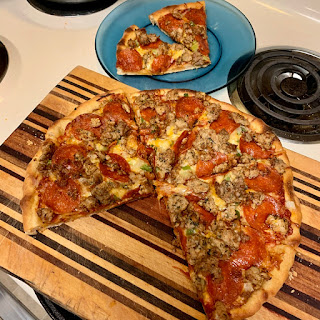
Pizza sliced after bakingOrdinarily, I use an Italian shredded cheese blend but since I already had some Colby Jack on hand, I used that, putting down a layer of cheese, then some green pepper and onions, then a second layer of cheese. Lastly, I added the pepperoni and some fried Italian sausage. It made for a heavy pie!

But boy, was it good! And since so many of the ingredients were already in the kitchen, it cost a fraction of a delivery pizza!

Tuesday, June 16, 2009

Simple Baked Whitefish (Cod, Pollack, Whiting)

I'm a fan of fish, fixed just about any way. I like fried fish with tarter sauce, grilled salmon fillets, orange roughy, tilapia, etc. But this week I found a sale at my supermarket of simple pollack fillets and decided to go for a light, baked fish.

Ingredients:
  • 1/2 lb whitefish fillets (one fillet/ person)
  • lemon pepper
  • parsley
  • 1 tbl butter or margarine
  • 1/2 lemon
  • salt
  • pepper

(Preheat oven to 325°) Begin with spraying a glass baking dish with nonstick cooking spray. Lay thawed fillets in the baking dish after checking for stray pin bones. Either melt the butter and drizzle on or take small bits of cold butter and arrange on top to get good coverage when it melts. Lightly salt and pepper the fillets, then sprinkle some lemon pepper lightly over fish, then use some chopped parsley (fresh is nice) across them. Finish with a squeeze of the lemon down the length of both fillets.

Bake uncovered in oven for 20-25 minutes. Fish is done when it the thickest part of the fillet will flake easily with a fork. Be careful removing fish from pan to plate, it will be fragile. But oh so light and flakey!

Serve with lemon wedge. Serves 2

Saturday, October 18, 2008

Sourdough Bread (And Buns!)

Mom always made sourdough bread.  We weren't rich folks, and that was a way that she could keep us in bread without having to buy yeast.  I still remember the hot loaves coming out of the oven, gently sliced and then loaded with real butter.  WOW!

This is my recipe, a combination of methods I've cobbled together from other bakers and several cookbooks.  It works well for me, I hope you like it.

I won't cover making your original starter, there are so many ways to start that it really doesn't matter.  Just start with a cup of starter and go from there!

Ingredients:
  • 1 cup of starter
  • 2 cups warm water
  • 2 cups flour

Mix all three and let proof for 8-10 hours (overnight).

Ingredients:
  • 4 cups flour
  • 3 tbl sugar
  • 3 tbl oil or melted shortening
  • 1 tsp salt
  • 1/4 tsp baking soda

Mix in most of the flour and the other ingredients until you can't beat with a spoon any more. Then dump onto floured work surface and knead in the rest of the flour. It may take more or less flour depending on how wet your dough is. Work about 10 minutes or until it quits sticking to your hand right away.

Put in greased bowl, cover, and put in out-of-the-way area (dark is best, with no drafts) for 1 1/2 hours (or until it doubles in size).

Punch down, divide in half an let rest for 10 mins. Then shape each loaf into a ball (for loaves) or 6-8 balls (for buns). Put into loaf pan or on greased (or non-stick) sheet and slice 3 quarter-inch grooves in the top to allow better rising. Let rise for 45 minutes or until double again.

Bake loaves @ 375° for 40-50 minutes. Spray with water before baking and then every 10 minutes. Cover during last 10 minutes with foil to keep crust from over-browning.

Bake rolls/buns @ 400° for 15-20 minutes. Spray before baking and at least 1 time during.

(Replenish starter with 3/4 cup milk and 1/2 to 1 cup flour, allow to work for 12 hours before refrigerating.)

Sunday, August 10, 2008

Potato Bread

Ingredients:
  •  2 small potatos, peeled and cubed
  •  1 1/2 cups water
  •  6 - 6 1/2 Cups flour (I have never got this much into 2 loaves, but you need this much for kneading).
  •  2 pkgs active dry yeast 
  •  2 Tbs. shortening
  •  1 Tbs. salt
  •  3 Tbs. sugar

Prep:
Boil potato cubes in the water (unsalted) for 10-12 minutes. Don't drain the potato water, instead skim out 1/2 cup of it and set aside to cool. Mash the potatos and water together, then add warm tap water to make 2 cups. When the 1/2 cup of set-aside potato water is between 110 to 115 degrees, mix it with the yeast to soften the yeast and start it growing. Once the yeast is dissolved, add the potato mixture (also cooled to between 110 and 115 degrees), 2 cups of the flour, and the sugar, salt, and shortening. Beat at low speed of mixer for 1/2 minute, then high speed for 3 minutes. The thin dough should be smooth with no lumps of flour or yeast.

If you have a mixer with dough hooks, get them out and mix in as much of the remaining flour as you can with the hooks at high speed. If you don't have dough hooks, mix as much of the flour in as you can with a spoon. At this point, the dough should be getting stiffer, but still very sticky. Turn it out onto a floured surface and knead in enough of the remaining flour as you can to make a moderately stiff dough that is smooth and elastic, but still a bit tacky if you rest your hand on it too long.

Shape into a ball and place in a greased bowl, turning it once to grease both sides. Cover and let rise till it's double in size (45 min to 1 hr). I usually place a wet tea towel of a light material on the top to add moisture and darkness and turn the oven on to "warm", sitting the dough on the stove or right next to it. Mom used a crockery bowl and a wet tea towel, then put the bowl on the top of the refridgerator, since heat rises toward the ceiling. The optimum temperature for yeast to rise is about 80 degrees, so don't get the dough too hot or cold. This first rise is called "proofing" the dough. Basically, you are "proving" that the yeast is working before you go on to the next step.

After rising, punch the dough down (literally punch the dough once, with enough strength to "shock" the bigger air bubbles and break them). Divide the dough in half (use a kitchen knife if you like) and then cover the dough with the tea towel and let it rest 10 minutes.
Shape each bit of dough into a loaf and put each in a greased 8x4x2 loaf pan. Cover with the tea towel and let rise again, till nearly double (about 30 - 35 minutes). Bake in a 375 degree oven on the middle shelf for 40 to 45 minutes. Check the bread at 30 minutes; if the top is browning too much, cover the loaves with foil to slow the browning for the last 15 minutes. Test for doneness by "thumping" the crust with your fingernail. If you get a hollow sound, it's done.

Bread is always a challenge. Differences in the type or freshness of the yeast, the ambient temperature, and the humidity can speed up or slow down the rising process. You may be tempted to let the dough rise more than double, or far above the rim of the loaf pan (an inch or two is ok), but don't do it. If you let bread dough rise too much, it will form big bubbles and then you have hollow spots (or "voids") in the finished bread.

Once the bread is done, turn it out of the pans and put on a wire rack to cool. If you try to cut the bread while it is too warm, it will mash the bread. Make sure the loaves are cool enough to handle comfortably before cutting. Use a bread knife (long knife with a rounded tip and lots of small serrations) or something similar, and don't put pressure on the bread with the knife. Use the sawing motion of the knife to do the work, as if you were sawing a piece of wood. Put your hand lightly on the top of the bread and cut through the crust, then curve your fingers over the cut to hold the top of the new slice close to the loaf instead of letting it fall over as you cut down through the loaf.

Good Biscuits (Kevin's recipe)

Ingredients:
  • 2 cups flour
  • 2 tsp. sugar or Splenda
  • 4 tsp. baking powder
  • 1/4 tsp. cream of tartar
  • 1/4 tsp. salt
  • 1/2 cup shortening
  • 2/3 cup milk

Prep:
Combine all dry ingredients and mix well. Cut in shortening until you get pea-sized dough, then add milk in a well all at once and stir with a fork. Keep going until the all/most of the flour is absorbed, then turn out onto a floured surface.

Fold but don't knead the dough until it's easy to work with and all the flour is absorbed. Don't overwork the dough, or your biscuits will be tough. Roll or pat out the dough to 1/2 inch and cut biscuits. Place on cookie sheet and bake at 425 for 10 minutes.

Make Your Own Biscuit Mix (like Bisquick)

Ingredients:
  • 3/4 Cup Flour
  • 1 1/4 tsp Baking Powder
  • 1 tsp Sugar
  • 1/3 tsp Salt
  • 2 1/2 TBL Shortening 

Prep:

Mix all the dry ingredients, then cut in the shortening until the mixture is the consistency of rough crumbs. Refrigerate up to six weeks. Makes 1 cup, for larger amounts the recipe scales up well.

"Corner Brownie" Cookies (Gluten Free!)

My friend Todd makes these terrific gluten-free cookies out of brownie mix! His recipe is below. INGREDIENTS 1 16oz brownie mix (I use ...